

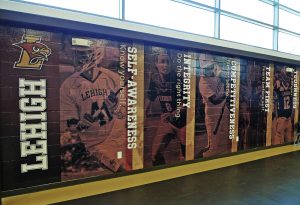
 Textured surfaces, like brick and cinder block walls, are some of the most sought-after advertising and marketing platforms today.
But preparing and applying graphics to these surfaces can pose challenges for any installer, novice to experienced.
Among numerous considerations, when preparing a textured surface application, installers need to look at the various textures and finishes that were previously applied. This process alone can be daunting as, for example, there are hundreds of brands and chemical make-ups of paints—each affecting how well a graphic’s adhesive will stick.
And when it comes time to actually apply the graphic, the effort, time, and techniques for textured surface applications are significantly different than smooth applications.
With the proper knowledge, right films, and appropriate tools, installers can master textured surface preparation and application. In addition to formal training from a skilled installer or expert, the following best practices will help achieve textured surface application success.
- Prepare and Pre-test the Surface.
Surface preparation is a critical first step in textured graphic applications. Prior to application, most surface contaminants must be removed.
For unpainted brick, poured concrete, or cinderblock walls, in most cases, using a stiff brush to dust away organic contaminants like dirt, grime, loose grout, bug spatters, bird droppings, and tree sap is sufficient.
If the surface has previously been painted, you may want to do a more thorough job of cleaning. To properly remove petrochemical contaminants (wax, road tar, grease, oils, gasoline, or pollution), wipe the surface with a lint-free cloth soaked in a solvent-based cleaner, like an automotive tar-and-wax remover. Avoid solvents that are weak (glass cleaners or alcohol), and solvents that are too strong and pure (paint thinner, acetone, and toluene).
Use another cloth to dry the surface and another to wipe the area with Isopropyl Alcohol (IPA) to remove any dust, solvent or detergent residue.
Helpful Tip: Surfaces must be fully dry prior to application, as moisture left over may result in premature graphics failure. Allow twenty-four hours of dry time.
To guarantee good adhesion, pre-test a section of the graphic. An ideal test is 10-by-10-inches in size and contains exposure to environmental extremes the graphic may encounter.
- Use the Right Tools.
Applying graphics to textured surfaces requires a few tools, including: Hard and soft squeegees; a heat gun capable of reaching 1,000°F (a hair dryer is not an acceptable substitute); and a semi-rigid foam roller.
- Choose a Film Known for Conformability.
For the best results, apply a durable cast film that can withstand high application heat and is known for its ability to quickly and flawlessly conform over the uneven textured surface without tearing or lifting. A gloss or matte overlaminating film can provide protection and ease of installation.
- Use the Hinge Method.
The hinge method allows for proper alignment and deters movement.
Align your graphic on the wall and hold in place with masking tape. Flip the top of the graphic back away from the wall and remove about two to four inches of the release liner to expose the adhesive.
Lay the exposed adhesive back up against the wall and then, starting in the center, begin installing the flat areas of the graphic first; use a soft squeegee to make overlapping strokes in each direction. Do not focus on the texture during this important first step.
Remove the next four to eight inches and repeat, working your way down the graphic until the entire panel is installed.
Move on to the next panel and repeat. For best results, at least a one-inch overlap is recommended to account for rough wall variability.
Helpful Tip: When applying graphics to outdoor textured surfaces, make sure each individually hinged graphic is taped down to avoid movement from the wind.
- Apply Heat to Conform the Film to the Rough Texture.
To get the graphic to conform to the rough surface, use a heat gun heated to at least 850°F and work the film into the surface in small sections from left to right. Heat the film and then immediately and firmly press the heated film onto the rough texture of the surface with a semi-rigid roller.
For brick or concrete blocks, apply the film onto the smoother surface first and then apply into the mortar joints from the middle out to allow the air to escape. For any remaining air pockets, gently poke the bubble with a pin, re-heat and press the air out with a soft cloth or roller.
- Relax, Reset, and Finish the Graphic.
To properly finish the application, lower the heat gun temperature to 220°F to 250°F and reapply heat to the graphic. This will relax and reset the film’s memory. Where the graphic is seamed, or overlapped, allow more time for the heat to penetrate.
Give extra care to the graphic’s edges as these are often overlooked, making them a common failure point. Graphics should start and end on the flattest portion of the textured surface, as ending in a mortar joint, for example, can result in graphic lifting.
Return to the graphic a second day to address areas that didn’t receive enough heat or pressure. It’s normal to have some lifting of the graphic from the textured wall or floor, depending on the roughness and depth of the surface.
One final piece of advice is to understand that some surfaces are near impossible to work with and are better to avoid, such as crumbling brick, stucco, plaster, and pressure-treated wood.
If a surface has large peaks and valleys, there won’t be enough surface area for the adhesive to bond to and, unfortunately, the surface likely won’t accept any material.
By Jeff Stadelman is marketing manager for Mactac Distributor Products (mactac.com).
All photos: Mactac.


