
 Darkness falls across the land, and the midnight hour is close at hand—at least it was for Exhibit 3 Fabrications as they faced down a hair-raising three-week deadline to turn around a thrilling identity sign for the entrance to Cedar Fair’s Kings Island amusement park in Ohio.
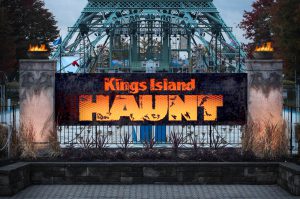
The sign was a temporary installation to welcome guests to Haunt, a special month-long attraction during the Halloween season featuring scare zones, haunted attractions, and live shows.
This wasn’t E3 Fabrications’ first interaction with Kings Island. The Erlanger, Kentucky-based sign company has worked with the amusement park in the past on ride signs (“A Legendary Sign,” August 2014).
Devilish Design
It was that past relationship that led Kings Island and Cedar Fair to call on E3 Fabrications again for the Haunt sign, which required a quick turnaround.
The amusement park sent over a PDF of what they wanted the sign to look like, but it didn’t include any details like size or materials.
“The design came over as a PDF, so first off, we used Illustrator to pull everything apart and start to size it up,” explains David “Dude” Johnson, president of E3 Fabrications. “We went back and forth with the client and Kings Island about overall size, because really, it was just a picture we had to work from.
“Once we decided what size we wanted to build everything and how we wanted to do each piece, we started breaking it down and creating DXF files so we could route pieces, waterjet cut the steel, and start routing the molds.”
Creepy Cabinet
The main portion of the sign is a fourteen-foot-long illuminated cabinet spelling out “Kings Island Haunt.”
The cabinet was constructed from welded steel tubing. The face is made from two sheets of steel that were welded together. The letters and small details were waterjet cut out of the steel. (Note: E3 Fabrications outsourced the waterjet cutting to PEDTECH, LLC, which completed the work on the 6.5-by-10-foot table of its FLOW waterjet machine.)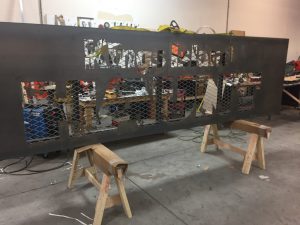
E3 Fabrications installed a steel mesh directly behind the letter cut-outs, which served the dual purpose of giving them a place to mount all of the small details and shapes to the letters and also kept guests from putting their hands inside the cabinet.
“When they had sent us the schematic, it didn’t have that mesh on it,” says Johnson. “We came up with that idea to help hold everything and to keep the public from being able to put their hand inside it.”
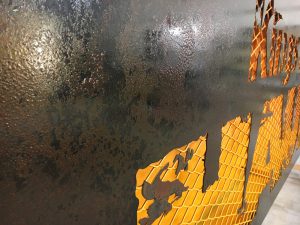 To up the spooky factor, the shop made the cabinet appear aged and rusted by applying Sculpt Nouveau’s Tiffany Green Patina.
“It’s designed really to patina copper and bronze, but you apply it to steel, and it does a natural rusting effect,” explains Austin Deal, painter/artist at E3 Fabrications. “We laid the sign flat with the face toward the sky, and I let it pool there and do its natural thing. Then I sealed it to lock in which stage of the rust I liked.”
The shop also added hooks to the top of the cabinet so it could easily be picked up by a Lull for installation.
Fire is a main design component of the sign, and E3 Fabrications wanted the cabinet to have a burning glow.
To achieve the look during the day when the sign isn’t lit, they inserted Dibond® into the back of the cabinet, which was painted with a gradation of yellow and orange acrylic polyurethane paints from Matthews Paint.
“We did the background so that, in the daytime, it still looked orange and fiery inside,” says Johnson. “Otherwise it would just be white, and it wouldn’t look right.”
At night, lighting effects achieve the desired fiery glow thanks to Ribbon Star 50/50 Waterproof LED Strip Lights RGB Lux from Ecolocity LED.
Three lighting strips, each 118 inches long and producing 2100 lumens, were used in the cabinet. The three lighting strips were used in combination with a U9 DMX Lighting Controller and software to run a specific program that mimicked flames.
“We were looking for something that we could control and give it that impression that it’s hot inside the box,” said David Proctor, CAD/machinist at E3 Fabrications. “The top of the cabinet had a different light pattern than the bottom. There were two strips in the bottom that were running the same program. And then the top strip had another program. It’s two different ten-second loops that alternate back and forth to create a flickering flame effect inside the cabinet.
“We used a computer to run it that would run standalone. So once you program from your PC, you can upload it to the computer and then when they turn the cabinet on, it will simply run the program.”
Columns from the Crypt
Also making up the sign are two columns abutting either side of the cabinet.
Made from welded steel tubing, the columns feature a hinged door for access to the interior components and mechanics. The steel tubing was sheeted with 1/4-inch Hardie concrete board.
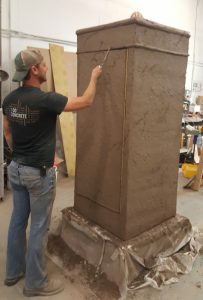 Over the board, fabricators applied Butterfield Color, a decorative concrete product. “It’s a great little product because it’s got all of these little polymers and small aggregates of sand. What makes it so strong is that it’s got GFRC [glass fiber reinforced concrete],” says Deal. “We sprayed it through a hopper gun to give it a good stick.”
Fabricators then made a custom scratch tool and created a scratch coat so that the final coat of Butterfield Color had something to grab onto.
“The only difference between the gray scratch coat and the final coat is I put a pigment color in there that actually dyed the concrete,” says Deal. “We had to look at color swatches to get something close to what they gave us in the concept art, and we came up with the smoke color.”
Deal mixed in Butterfield Color’s Unimix powder pigment with the concrete using the recommended ratio and then sprayed it on and troweled it out.
To add the textural finishing touches, Deal used a textural roller as a base and moved on from there.
“I had fun experimenting with what things I could impress in concrete. I actually used fake hollies from a Christmas decoration to get nice pittings—kind of like a limestone look,” he says. “I used different sized brushes to get that veiny, kind of grainy texture. And then I took my trowels and drew in lines.
“I let it sit for a day to let the water naturally dry out and help strengthen it.”
After it dried, Deal mixed up a greyish-brown Unimix color called Soapstone and washed it over the columns. “I took a gigantic shop broom and just brushed it on like paint,” says Deal. “But I let it run, and it fell in the cracks. This gave it that antique look.”
Deal went back in with a small brush and added more of the mixture into the cracks to make it appear “sooty.” He also added some drip edges along the top.
Forging Fire
On top of each column is a fire bowl, which holds real flame.
At first, E3 Fabrications planned to buy actual fire bowls, but they ended up being too expensive for just the two they needed. So they decided to make them using large stainless steel mixing bowls as hump molds.
“I just took a regular bag of concrete mix, a standard 4000psi Quikrete mix, and I slapped it up against the bowl. I still put a scrim in there just to give it some strength, like rebar,” says Deal. “When the concrete was still, I put my overlay on it so the bonding was really spot on. I textured it the same [as the columns], and the next day, I flipped it upside down and pulled the steel bowl out of it.
“I faced it with the same overlay inside of it so that on the rare occasion someone ever looked inside the bowl, it would still fit the look.”
Each fire bowl has a burner inside of it for real flame. “Kings Island has a 10,000-pound, huge propane tank they use to light up a lot of things,” says Johnson. “We provided the propane burners and the hook-ups inside the columns so they could just attach their propane to our columns.”
Grizzly Ghouls
One of the first macabre beings to greet visitors to Haunt are two bats—one affixed to the front of each column.
To craft these winged creatures, Deal knew he wanted to use a mold. So he started by hand drawing the bat on a tablet in Illustrator.
With the design in hand, he used the shop’s Precix 5-by-10-foot router to carve the general outline of the bat out of fifteen-pound Precision Board HDU from Coastal Enterprises.
“It was two-inch HDU, so I just removed a lot of material with the CNC as opposed to going back and doing it all by hand, since we were pretty tight on time,” says Deal. “I let the machine hog out the pockets for me, but all the detail was all hand done.”
When the routing and hand carving were finished, Deal gave the bat a good coating of Matthews Gray Epoxy Primer so that it could hold up to any mold.
“I let the bat sit for a while to figure out a cost-effective way to make a mold. I did a really old-school way of making a mold, and it was a clay press mold,” says Deal. “If we were making 1,000 bats, that would make it more appropriate to use silicone molds. But we only needed two, so we went with clay.”
To start, he coated the bat with a mixture of 25 percent water/75 percent Dawn® dish soap as a mold release. “I anchored the bat to a board and then started going to town pressing little bits of clay all over this bat,” says Deal. “I built it up, and when I flipped the clay block over, I could extract the bat without the clay morphing so it could hold up against it’s own weight.
“Basically I just made a negative imprint of a bat, like a footprint in the mud.”
He coated the clay in the same 25/75 release and then applied a base coat of the Butterfield Color concrete mix he used on the columns. He added a scrim in the base coat to give it more strength. He also included 5/16 bolts in the concrete mixture, which they later used to through-bolt the bat into the column.
“After everything was said and done and it dried overnight, I flipped it upside down and peeled the clay away. I could reuse that clay so that was the cost-effective thing,” explains Deal. “Then I ran the bat under some water to get rid of the rest of the clay and got a really strong concrete bat.”
After he washed the bat off, he applied more treatments to make it darker. He repeated the process to make the second bat.
Petrifying Problem
There was one final, petrifying problem to solve: Because the sign is temporary, E3 Fabrications also had to consider the footings and bases for this sign.
“The sign is basically up for one month, and the client didn’t want to have to pour their own footers or anything because they knew the sign was to be dismantled,” explains Johnson. “That was probably one of our biggest challenges—well how are we going to make this huge sign that’s not going to fall over?”
The solution was to create bases for the columns that serve as footers for the sign.
So two bases were poured from concrete with bolts inside of them that the columns would attach to. The bases weigh about 500 pounds each, so a steel structure with a hook in the middle was also included in the base so that the Lull could pick them up for installation.
From start to finish, the fabrication took the full three weeks. “We were down to the last minute to get that thing out the door,” says Johnson.
Insidious Installation
The sign was installed the day before Haunt opened.
Since it was a weekday and the park isn’t open normal hours in the fall, the crew was able to drive right into the park and set up the sign without any interruptions.
The sign was built to bolt together, and it was transported to the job site in pieces on a flatbed trailer.
The installation started with the bases. “We leveled out two areas of ground, tamped it down, put some gravel underneath it and a sheet of plywood so we could set the bases on it,” says Johnson. “[The park] put mulch back over the plywood so that it would look like it’s just sitting in the mulch.”
Using a Lull, they lifted and placed first the columns and then the cabinet. “We shimmied everything up and bolted it together,” says Johnson. “From there, we were able to reassemble the back of the sign, [wire] the LEDs, and hook up the propane.
“We also put safety hooks that chain back to the pole behind the sign onsite just so it would never be blown over.”
The installation of the 19-foot-long-by-7.5-foot-tall sign was a treat that went off without any tricks.
“Normally when we’re building anything, we have to think about how we’re going to install it, so hopefully we always are able to foresee any types of incidents,” says Johnson.
After Haunt was over, E3 Fabrications returned to the site to dismantle the sign so that Kings Island could store it until next year.
The story of this chilling sign has a happy ending as Kings Island was so impressed with the finished sign that they contracted E3 Fabrications to do a similar backlit identity sign for their Winter Fest.
By Ashley Bray
All photos: Exhibit 3 Fabrications.


